Ads

Showing posts with label Mandelbulb 3D. Show all posts

Saturday, January 28, 2012

3D Fractal Art (Mine and in general)

So I thought I should finally share some of my favourite pieces that I've done so far, and also talk a bit about how I go about the creation process.

The first issue on my mind is something that came up in an e-mail with a new friend of mind, Jing-reed, who has recently left a few very kind comments at the bottom of my Mandelbulb 3D tutorial pages. I told him that I've had a rule, since I started: Never load other people's parameters to work off of. I tried this a few times way back, but producing anything in this way always made me feel a bit empty... Like the piece wasn't really, truly mine. And this still holds true... But, my friend mentioned that he has used Ultra-Fractals for some time and had always used other people's parameters as a way to learn techniques, which he could then use later in original works of his own... Why I never thought of doing this is beyond me...

Ok, now, on to some of my artwork...

The first piece I was really proud of, and still today is my favourite, would be "Fury" :

Fury
I remember I came upon it by accident, when I first learnt how to use the cutting tool. It's simply the Mandelbox formula, cut along it's z-axis. I tweaked the parameters very slightly, zoomed into the edge of one of the Mandelbrot shapes, and found something that looked cool. A few colour changes, and a bit of mist, and voila, I achieved the above. It's got an organic feel to it that I really like. Much of the other stuff I've done is much more mechanical.

One such example, although it's got a touch of organic-ness in it too, is Mechaniclysm:

Mechaniclysm
Without loading the m3i in Mandelbulb 3D, what I can tell you from memory is that it's a Julia, of some formula combined with one of the Menger formulae. I remember zooming in a LOT, until I found that spot... And I only noticed the doubled M's after I'd uploaded it to my Deviant Art account =)

Then, my most recent two pieces, I am especially proud of =) ... :

"Dawn at the Polynite Mines of Mistle"

Dawn at the Polynite Mines of Mistle
This one was, as the name so cryptically suggests, a combination of the Msltoe_Sym formula and the _Polyfolding add-on. I really want to explore this combination more... It's really beautiful, and has a lot of landscape-creating potential. With some colour next time, I plan on creating something beautifully fantasy-inspired. The only problem is that the Msltoe_sym formula takes forever to render. The above took a day and a half o.O ...

and "Primary Seat of the Angry Child Buddha" ...

Primary Seat of the Angry Child Buddha
This was done with only the MengerIFS formula, after I friendly-challenged Mandelwerk to create something beautiful using it only, hehe. (The question being discussed at the time was how I believed it was a challenge to find not-so-fractally-looking images in order to create really beautiful fractal artwork. Mandelwerk correctly pointed out that many of his very good artworks are at the same time obviously very fractally). (See the two examples he gave:  Pupal Metamorphosis of Queen Cleopatra and Mathematicians framed by their own formulas).

The seated buddha in the center quite luckily and extraordinarily appeared when I clicked there with the first positional light. I then went and used all the available light tabs to add more. (Only positional lighting was used).

As for the creational process... Well, as already illuded to, most of what I've done so far has been with a lot of frustrated perseverance, and luck. Looking for a great fractal form can take forever... And then, suddenly, something will pop up and you can spend hours saving location after location for possible use later. And hours more playing around with the colours of each one. (Also remember, always render your fractal to the size you want it before perfecting the colours. If you do the colours first, they will change dramatically when rendering up.)

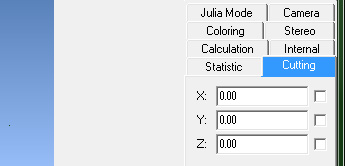
Lastly, Jesse has added a wonderful new feature to the program's navigator: A sidebar, which has controls (sliding bars) that alter (to your preferred degree, from very fine changes, to very big changes) the parameters of each of the formulae you are using. I've only used this once so far (The Angry Child Buddha pic) and can't wait to use it more. I'll feature it in a new Tutorial page soon, along with a few more features I haven't yet explored.

That's it for this post =)

Sunday, January 22, 2012

Mandelbulb 3D Tutorial: The 'DE combinate' button


Right! Back again for another tutorial page. I'm much more experienced now with Mandelbulb 3D, and have thought that I should do a revision of much of what I've already posted, but as that's not terribly exciting, and  as I feel like doing something exciting, I'm going to try out the DE Combinate feature of the formula box.

I learnt about this from two of my favourite 3D fractal artists, Mandelwerk and Bib, through the following works of theirs (and more):

Claustrophobia by Infinite Rooms by Mandelwerk

Two Worlds by bib993

So when I saw these amazing images, of course the first thing I wondered was 'How did they do it?' ... And the answer is DE Combinate. As of right now though, I haven't tried using it yet. I like to keep my first time experiments for when I'm in blogging mode, so that you all learn with me as I go.

My intention is first to try and copy Mandelwerk's "Claustrophobia by Infinite Rooms" and Bib's "Two Worlds" and explain how I did it. Then I'll alter one of them, to test out DE Com features...

Let's go!


Alrighty... The first part was easy. Simply select the DE Combinate button in the formula window (default button is 'Alternate' (as seen above)), and then choose "MengerIFS" as your first formula, and "Integer Power" as your second formula. Click on Calculate 3D and this is what you get:


Next step, use the navigator to face the side of the cube:


Now it's just a question of colour, I think =) .. And, the sides are curved, and Mandelwerk's original has very straight lines... Will try figure it out now.

<...>

Ok, so after an annoying amount of time trying to get his exact colouring, I've given up =P ... But I figured out the curved edges. In the main window, there's a tab called 'Camera' ... I tried clicking the 'Rectilinear Lense' and that did the trick =) ... Then it's just a matter of fine tuning in the navigator and voila:

My attempt at duplicating Mandelwerk's version.


Next, Bib's very intimidating 'Two Worlds' as seen above.

Let me load the two formulae mentioned in the comments and see what I get...
...
Uhm... Ok so nevermind that... =P ... I even asked him for some hints, and he gave me the four formulae he used, but no matter how I tweak the parameters, I can't figure out how he did it =P ... I'm thinking some background in advanced maths may be necessary...

So now, on to some experimentation! I'll use my version of Mandelwerk's Claustrophobia. ... First things first, when you choose DE Combinate in the formulae box, at the bottom of the first formula, this appears:


Just to see what happens, I chose the next option 'Ma' and rendered. As Jesse's little description popup-box says ... "only overlapping parts" .. of the two formulae, that is =) ... After repositioning (zoomed out and rotated) and some minor colour changes, this is what it looks like:


Next, I tried the 'Av' option, and got this (Note, it took much longer to render with this option.) :


Here's a close-up, just to see:


The option 'S1' looks like this:


Then I changed the "Ds" value that appears if you choose 'S1' ... It is 0.5 by default. I tried 0.2 and got this:


Then I zoomed into the center there and did a few colour changes to get this:


=)

And with Ds.= -0.5 :


The option S2 you can check out for yourself... Not much different to S1 but remember that with different formulae, or even just with simple parameter tweaks, results can change drastically.

That completes the DE Combinate tutorial ... Next, I'm hoping to cover that post-process tab ;)

If my tutorial is helping you, please consider supporting me over at my Patreon page.
I also have a deviantArt gallery.

Wednesday, September 28, 2011

Fractal World: 35th Century Earth

These images I happily found quite by accident, in the initial stages of my exploration into other realms. In this one, I am almost sure I found a future Earth. I do not know whether this future is absolutely certain, or whether I'm only glimpsing at a possibility... Either way, it's fascinating, and I can't wait to explore it more.

35th Century Earth
The year is 3553 ... Earth still spins, orbiting the same old sun. Its atmosphere is no longer breathable, having been irreparably damaged in the 31st century.

The last surface trees died out over two centuries ago and exist now only as the highly prized objects of a hobby only the Elite are able to practise.

The green you see is a bio-synthetic, methane-to-oxygen converting plant grown by EarthCore, the global government organisation. They are the self-appointed caretakers of what is left of the rock in space human beings call home. 

The dark blue you see are water ducts, reaching the surface in order to keep the constantly flowing water cool. 

Energy has never been more abundant since we tapped into the earth's deepest geothermal depths.

The windows exist only because the vast intercity network developed early in the 24th century, covering the earth's entire landmass in just under a 2 centuries. From there, we had only one way to go: down. Before, the richest of the rich claimed surface level residences for the amazing "skyviews" caused by an already changing (though still breathable) atmosphere. Huge hivehomes were built in allocated areas below ground for the poor masses.

Now though, those same ma
sses exist only at the surface, when the atmosphere became poison, the air icy cold, the sky a constant, ominous red-black. The rich dug down, and continue to build lavish underground oasis's while the rest squabble over places to live that have as little atmosphere leaking into them as possible.


Lower Class Residential
A block of lower-class residential homes, a view from an opposite block. This picture taken by an EarthCore Archiver, whose purpose it is to collect information and data for the History Vaults.

Each one of those seemingly singular viewports in fact contains at least 20 homes.


Rural Lands
Nestled deep in a valley, and reminiscent of the ancient 21st century Chinese rice farms, this is a view of one of the once renowned factory farmlands, now, of course, completely abandoned since the Taint (when humans poisoned their atmosphere irreparably in the 31st century). 

The green you see is a bio-synthetic, methane-to-oxygen converting plant grown by EarthCore, the global government organisation. They are the self-appointed caretakers of what is left of the rock in space human beings call home. 

Do not be fooled by the blue tint of what was once verdant, kilometres wide, farmland. It is not water, but cold steel.

Saturday, September 24, 2011

Mandelbulb 3D Tutorial: Julia Mode

Ok, back once again for another M3D tutorial page!

I'm going to assume that most of you already know what a Julia fractal is. (Not that it is vital for you to be able to use the Julia mode tab in M3D ... But if you're one of those people who dove straight into M3D and 3D fractals because of how cool they look, and understand little else about Mandelbrot, or Julia, etc, go have a look at my Introduction to Fractals tutorial. It will probably be worth it :) ).

Ok, well, in M3D, just as 2D fractals are plotted out on the complex plane (cartesian x-y axis), 3D fractals are plotted out in a cartesian complex "space" (x,y and z .. There's a "w" too sometimes but I'm really not sure how that works (yet!)).

And just as every point on that complex plane has a corresponding Julia, so does every infinite "voxel" in the 3D complex space.

Don't worry if you don't understand this... Just go ahead and try it out. I loaded up the first formula on the list: Benesi1Pow2.


Then, I simply clicked on the Julia tab, checked the little "Calculate Julia" tick box (with x=1, the rest 0), and clicked the Calculate 3D button.


Not a very interesting fractal I know... But I then played around with the x,y and z co-ordinates, and here's what I got:

Benesi1Pow2Julia x=0.1 y=0.4 z=0.2

Benesi1Pow2Julia x=0 y=1 z=0

Benesi1Pow2Julia x=-0.2 y=-0.1 z=0

Benesi1Pow2Julia x=0.5 y=0.5 z=0.5

Benesi1Pow2Julia x=-1 y=0.8 z=-0.4

Benesi1Pow2 Julia x=0 y=0 z=1 
As you can see, a lot of variation is possible with only one formula. And if you're zoomed into a Julia quite deeply, you can try tweaking one of the x,y or z parameters only very slightly, to see what changes :) ... It's a matter of trial and error, but some amazing images can be found...

My Fractal Worlds that I've just started (see previous blog entries) were all discovered using Julias of various hybrid formulae. (That's something to remember: You can combine different formulae and then apply the Julia, or you can choose one formulae, find a great julia, and then fuse it with some other formula.)

As they say at Fractal Forums, the possibilities are infinite.


If my tutorial is helping you, please consider supporting me over at my Patreon page.
I also have a deviantArt gallery.


Next Mandelbulb 3D tutorial page: The DE Combinate Button

Wednesday, September 21, 2011

But is it art?


The question of whether fractal art is real art has sometimes, sort-of, come up in my mind, but always was disregarded for "Of course it is!", and then I got back to exploring. But really... It seems to be a bigger issue, worthy perhaps of more than one blogpost. So from now on I'll be looking out for interesting articles/comments about this all over the place, and will post about it here. After a few posts, I'll create a page to add to menu above, as it is a subject worth featuring.

To start with, here is a piece by Mandelwerk called "Mona Lisa Orbittrapped" (See high resolution on Deviant Art)... He adds a comment beneath it in his dA account:

Mona Lisa Orbittrapped by Mandelwerk

The Louvre, the golden year of 2067.

& my 5 cents about finding a masterpiece in a fractal.

Opposite to some critics on the net I have a strong belief that someone some day will find a masterpiece, "Mona Lisa Class", in a fractal.

Tuesday, September 20, 2011

Fractal World: Organic

Here I discovered something extraordinary... Though only showing these three images, I've seen so much more... Entire planets that seem to be alive. Pliable, almost fleshy rock. Gigantic structures that seem to be breathing. Alien life, but extremely difficult to recognise as such. A lot more observation is needed.

Mitosis

Exodus 17:6

Osmosis


Thursday, September 15, 2011

Fractal World: Fuzzy

These first three images mesmerised me when I first encountered them. Upon applying my IDC's PCA (Probable Colour Approximation) function, I gained vision over the initially perplexing world and flew over fields and fields of what you see below. As you can see, the scenery changed quite drastically the further I explored.

Spore

Pollen

Seed

Wednesday, September 14, 2011

Fractal World: Mechan

The first few 3 images I've managed to capture, of dubious quality, from the Mechan Universe. I have no idea of the nature of the locations, nor have I any idea whether the colours are accurate or not. With time, I expect to gain a deeper understanding of this fascinating world... Perhaps even capture images of a few living entities.

Antechamber
 This is the first image I captured. I called it Antechamber on a whim but of course no one can know what this location's purpose is. Much more exploration is necessary.

Antechamber - Higher Perspective
 This second image is exactly as it's caption implies. I took my IDC (Inter-Dimensional Camera) up and further back, and took another shot. The colours changed somewhat, and oddly enough, the shape of some of the structures changed too. Peculiar...

Sentinels
I tried different co-ordinates here and found these 6 interesting little guys. Actually, the same sort are in the previous two images too. Not sure, but I think they are the first signs of something life-like. Perhaps they're super-intelligent machine-beings, convening on the strange feeling they're all experiencing suddenly, like they're being watched... Or  could be that they're just sentinel drones, in their Standard Watch Positions assigned by the Omnimind.

Sunday, September 4, 2011

Fractal Worlds

Hello! I'm back.

As you all may have noticed, I've not been posting things. Actually, probably, none of you noticed that :P ... But that's ok. It's been a combination of personal life problems and a flood of work I had neglected which I had to catch up on. I have been doing bits of Fractal Art here and there though, which you can see at my deviantArt account.


Out of everything I've done, I only REALLY love 2 or 3 of them. The last one, though, Mechaniclysm (above), gave me an idea...:

Sunday, July 24, 2011

Interview with DavidMakin!

David Makin is another fractalnaut who frequently haunts the hallways of fractalforums.com ... Here are his answers to my 8 question interview.

Pandora's Box ~ See more at David's dA page

What first got you into Fractals?

In April 1999 I had some free time and was just browsing the web and came across Fractint.
I had heard of fractals and vaguely recalled some psychedelic imagery being associated with the term but I had no idea what they were.
After using Fractint for around an hour or so I was well and truly hooked on both the Art and Math of Fractals - as with many programmers/mathematicians I was staggered by the (apparent) simplicity of the maths involved in producing such complicated and beautiful results.
In fact it was the second revelatory moment in my life - the first being when I read through a BASIC manual age 20 (1982) after never having been near a computer in my life before.
Almost immediately after trying Fractint (like many other programmers) I set about writing my own fractal software - the now rather outdated "MMFrac" (Makin' Magic Fractals).

In your opinion, which programs for both 2D and 3D fractals are absolute must-have's for any
aspiring fractalnaut?

Interview with bib!

I posted the Interview with Mandelwerk link on fractalforums.com and asked if anyone else would like to answer the same questions. Here is bib's response :)

Underwater Amazing Object by bib - See more on bib's dA page
What first got you into Fractals?

My father bought me the famous book "The beauty of fractals" shortly after it came out, I was 13.
At the same time my cousin who was an Amiga geek programmed the Mandelbrot set in assembler, it was 
fascinating.

My programming skills were not sufficient, so I started to draw fractals by hand, starting with the Pythagoras tree.
I soon discovered an original method to draw by hand the Levy dragon (at that time I thought I had invented a new fractal!)

In your opinion, which programs for both 2D and 3D fractals are absolute must-have's for any
aspiring fractalnaut?

Thursday, July 21, 2011

Interview with Mandelwerk!

Temple of Chaotic Borderlines (Won the Mandelbrot Tribute Contestat dA)


The only reason I started this blog 2 months ago, the only reason that I became so suddenly fascinated with fractals, was because I found the 3D fractal art of Mandelwerk on DeviantArt. After going through almost his entire gallery, I got really into everything, discovered the maths behind 2D fractals, and eventually downloaded Mandelbulb 3D to try some 3D fractal art of my own :) ... (Go to Mandelwerk's Deviant Art Page to see more images like the above)

Then I decided to ask him 8 simple questions, with the intention of blogging them, and he graciously answered them for me:

What first got you into Fractals?

Wednesday, July 20, 2011

Mandelbulb 3D Tutorial: Render Quality (those damn pixels!)

Alrighty! I'm slowing down with my posts and to all who missed me, my apologies! ... I've had this Mandelbulb 3D tutorial in my head so I forgot a little that this is a blog and I can (and should) post about anything, in between tutorial pages :)

So I'll do that - but for now, I'm going to share with you my discovery of how to improve the state of your fractal if it's full of annoying little noisy pixels. As an example, I zoomed into an appropriate area using the Amazing Box formula, with lots of pixelation happening along the edges and in various spots, etc.

Now before I start, let me tell you this: The better you want your image to look like, the longer it will take to render. As I'm sure you already know, when you use the "preview" mode to render, it goes quickly, but the image is often riddled with pixels. As you go up in quality, using the "Video", "Mid" and "High" modes, renders take longer but the pixels start disappearing into nice smooth satisfying surfaces/curves.

(Something to note is that, sometimes (really, not always) a render with "High" mode comes out looking very different (and usually much better-looking) than in "Preview" mode. So do not give up after "Viewing to Main" once. Try Video and Mid, see if the fractal changes for the better, etc)

Something else very important to note is that often, as I'm sure you've already encountered, what you see in the Navigator window is not all what comes out in the Render window. This is just one of those things... Sometimes, it'll just be the colouring that's different, and sometimes, it's the whole shape of everything, as is the case with the example I used for this Tut page. In fact, let me start here. I said I used Amazing Box:

Zoom somewhere in Amazing Box in navigator window - 20 iterations
But then, when I clecked on view to main, and rendered the bugger in preview mode, I got this:

Monday, July 11, 2011

Mandelbulb 3D Tutorial: Cutting!

While playing around today on M3D, on a whim I decided to click on the Cutting tab in the Render window, just to have a look. 'Turns out, cutting can be a whole lot of fun :)

The Cutting Tab
To best demonstrate this great little tool, I'm going to use the same formula that loads on default when opening the program, except, I'm going to change the power and make it 2 instead of 8. Now many of you may have already loaded this formula with this little change, since the original 2D Mandelbrot set uses the 2nd power. And many of you would have gone, "Hmm, but that looks nothing even near the amazing Mandelbrot set!" ... Well, if you slice that weird looking thing using the cutting tool, you'll see something more familiar ;)

Allow me to demonstrate. Here is the very strange looking 3D version of the Mandelbrot set:

3D Mandelbrot Set
Next, I simply clicked on the z-axis checkbox (See image above), left the value as 0.00, and clicked Calculate 3D ... :

3D Mandelbrot Set cut along z Axis at 0.00
:) ... Remember this? Isn't it beautiful? Now, the nice thing about this is that, you can zoom into those little nooks and crannies, some of which are not really reachable when you're trying to navigate the entire 3D fractal in it's full bulk. Here, let me show you...:

Zoom-in 01

Zoom-in 02

Zoom-in 03
Nice :) Now let me change the colouring a bit so we can better see what's going on in there:


Well, it's only a little better, but you get the idea :) ... From here you can choose a spot, zoom in, zoom back out again, choose a different spot and try again, etc... With different formulas even the most experienced 3D fractalnauts would be able to find new and interesting areas had they never used cutting before.

Ok, now I'll load the original Mandelbulb (power 8) to demonstrate further. Here she is, cut in exactly the same way as above:

Mandelbulb cut along Z-axis at 0.00

Now, what happens if we change the value "0.00" ? It gets cut through either higher or lower, depending on, of course, whether you put in a positive or negative value. Here is a series of screenshots to demonstrate:

Mandelbulb cut along Z-axis at -0.8

Mandelbulb cut along Z-axis at -0.4

Mandelbulb cut along Z-axis at -0.2

Mandelbulb cut along Z-axis at 0.3

Mandelbulb cut along Z-axis at 0.6
So it follows that the same thing can be done with the x and y axis. And you can turn any/all of them on at the same time. Here I cut the Mandelbulb along the z and y axi, both at 0.00 (with a bit of rotation for a better view):


And that concludes my 5th Tutorial page about the wonderful Mandelbulb 3D program. Thanks for watching! :)


If my tutorial is helping you, please consider supporting me over at my Patreon page.
I also have a deviantArt gallery.


Go to the next Tutorial page - Mandelbulb 3D Tutorial: Render Quality