Ads

Showing posts with label Tutorials. Show all posts

Sunday, January 22, 2012

Mandelbulb 3D Tutorial: The 'DE combinate' button


Right! Back again for another tutorial page. I'm much more experienced now with Mandelbulb 3D, and have thought that I should do a revision of much of what I've already posted, but as that's not terribly exciting, and  as I feel like doing something exciting, I'm going to try out the DE Combinate feature of the formula box.

I learnt about this from two of my favourite 3D fractal artists, Mandelwerk and Bib, through the following works of theirs (and more):

Claustrophobia by Infinite Rooms by Mandelwerk

Two Worlds by bib993

So when I saw these amazing images, of course the first thing I wondered was 'How did they do it?' ... And the answer is DE Combinate. As of right now though, I haven't tried using it yet. I like to keep my first time experiments for when I'm in blogging mode, so that you all learn with me as I go.

My intention is first to try and copy Mandelwerk's "Claustrophobia by Infinite Rooms" and Bib's "Two Worlds" and explain how I did it. Then I'll alter one of them, to test out DE Com features...

Let's go!


Alrighty... The first part was easy. Simply select the DE Combinate button in the formula window (default button is 'Alternate' (as seen above)), and then choose "MengerIFS" as your first formula, and "Integer Power" as your second formula. Click on Calculate 3D and this is what you get:


Next step, use the navigator to face the side of the cube:


Now it's just a question of colour, I think =) .. And, the sides are curved, and Mandelwerk's original has very straight lines... Will try figure it out now.

<...>

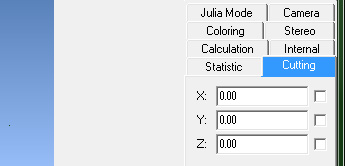
Ok, so after an annoying amount of time trying to get his exact colouring, I've given up =P ... But I figured out the curved edges. In the main window, there's a tab called 'Camera' ... I tried clicking the 'Rectilinear Lense' and that did the trick =) ... Then it's just a matter of fine tuning in the navigator and voila:

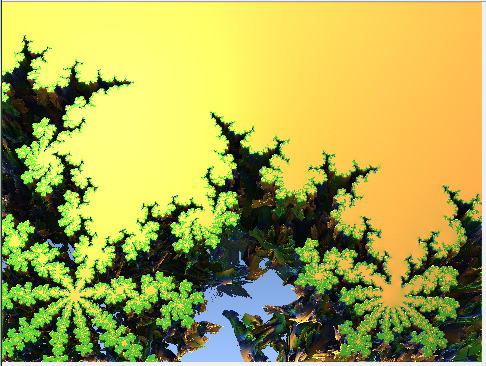
My attempt at duplicating Mandelwerk's version.


Next, Bib's very intimidating 'Two Worlds' as seen above.

Let me load the two formulae mentioned in the comments and see what I get...
...
Uhm... Ok so nevermind that... =P ... I even asked him for some hints, and he gave me the four formulae he used, but no matter how I tweak the parameters, I can't figure out how he did it =P ... I'm thinking some background in advanced maths may be necessary...

So now, on to some experimentation! I'll use my version of Mandelwerk's Claustrophobia. ... First things first, when you choose DE Combinate in the formulae box, at the bottom of the first formula, this appears:


Just to see what happens, I chose the next option 'Ma' and rendered. As Jesse's little description popup-box says ... "only overlapping parts" .. of the two formulae, that is =) ... After repositioning (zoomed out and rotated) and some minor colour changes, this is what it looks like:


Next, I tried the 'Av' option, and got this (Note, it took much longer to render with this option.) :


Here's a close-up, just to see:


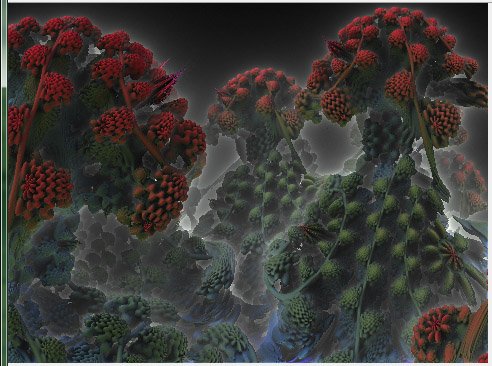
The option 'S1' looks like this:


Then I changed the "Ds" value that appears if you choose 'S1' ... It is 0.5 by default. I tried 0.2 and got this:


Then I zoomed into the center there and did a few colour changes to get this:


=)

And with Ds.= -0.5 :


The option S2 you can check out for yourself... Not much different to S1 but remember that with different formulae, or even just with simple parameter tweaks, results can change drastically.

That completes the DE Combinate tutorial ... Next, I'm hoping to cover that post-process tab ;)

If my tutorial is helping you, please consider supporting me over at my Patreon page.
I also have a deviantArt gallery.

Saturday, September 24, 2011

Mandelbulb 3D Tutorial: Julia Mode

Ok, back once again for another M3D tutorial page!

I'm going to assume that most of you already know what a Julia fractal is. (Not that it is vital for you to be able to use the Julia mode tab in M3D ... But if you're one of those people who dove straight into M3D and 3D fractals because of how cool they look, and understand little else about Mandelbrot, or Julia, etc, go have a look at my Introduction to Fractals tutorial. It will probably be worth it :) ).

Ok, well, in M3D, just as 2D fractals are plotted out on the complex plane (cartesian x-y axis), 3D fractals are plotted out in a cartesian complex "space" (x,y and z .. There's a "w" too sometimes but I'm really not sure how that works (yet!)).

And just as every point on that complex plane has a corresponding Julia, so does every infinite "voxel" in the 3D complex space.

Don't worry if you don't understand this... Just go ahead and try it out. I loaded up the first formula on the list: Benesi1Pow2.


Then, I simply clicked on the Julia tab, checked the little "Calculate Julia" tick box (with x=1, the rest 0), and clicked the Calculate 3D button.


Not a very interesting fractal I know... But I then played around with the x,y and z co-ordinates, and here's what I got:

Benesi1Pow2Julia x=0.1 y=0.4 z=0.2

Benesi1Pow2Julia x=0 y=1 z=0

Benesi1Pow2Julia x=-0.2 y=-0.1 z=0

Benesi1Pow2Julia x=0.5 y=0.5 z=0.5

Benesi1Pow2Julia x=-1 y=0.8 z=-0.4

Benesi1Pow2 Julia x=0 y=0 z=1 
As you can see, a lot of variation is possible with only one formula. And if you're zoomed into a Julia quite deeply, you can try tweaking one of the x,y or z parameters only very slightly, to see what changes :) ... It's a matter of trial and error, but some amazing images can be found...

My Fractal Worlds that I've just started (see previous blog entries) were all discovered using Julias of various hybrid formulae. (That's something to remember: You can combine different formulae and then apply the Julia, or you can choose one formulae, find a great julia, and then fuse it with some other formula.)

As they say at Fractal Forums, the possibilities are infinite.


If my tutorial is helping you, please consider supporting me over at my Patreon page.
I also have a deviantArt gallery.


Next Mandelbulb 3D tutorial page: The DE Combinate Button

Wednesday, July 20, 2011

Mandelbulb 3D Tutorial: Render Quality (those damn pixels!)

Alrighty! I'm slowing down with my posts and to all who missed me, my apologies! ... I've had this Mandelbulb 3D tutorial in my head so I forgot a little that this is a blog and I can (and should) post about anything, in between tutorial pages :)

So I'll do that - but for now, I'm going to share with you my discovery of how to improve the state of your fractal if it's full of annoying little noisy pixels. As an example, I zoomed into an appropriate area using the Amazing Box formula, with lots of pixelation happening along the edges and in various spots, etc.

Now before I start, let me tell you this: The better you want your image to look like, the longer it will take to render. As I'm sure you already know, when you use the "preview" mode to render, it goes quickly, but the image is often riddled with pixels. As you go up in quality, using the "Video", "Mid" and "High" modes, renders take longer but the pixels start disappearing into nice smooth satisfying surfaces/curves.

(Something to note is that, sometimes (really, not always) a render with "High" mode comes out looking very different (and usually much better-looking) than in "Preview" mode. So do not give up after "Viewing to Main" once. Try Video and Mid, see if the fractal changes for the better, etc)

Something else very important to note is that often, as I'm sure you've already encountered, what you see in the Navigator window is not all what comes out in the Render window. This is just one of those things... Sometimes, it'll just be the colouring that's different, and sometimes, it's the whole shape of everything, as is the case with the example I used for this Tut page. In fact, let me start here. I said I used Amazing Box:

Zoom somewhere in Amazing Box in navigator window - 20 iterations
But then, when I clecked on view to main, and rendered the bugger in preview mode, I got this:

Monday, July 11, 2011

Mandelbulb 3D Tutorial: Cutting!

While playing around today on M3D, on a whim I decided to click on the Cutting tab in the Render window, just to have a look. 'Turns out, cutting can be a whole lot of fun :)

The Cutting Tab
To best demonstrate this great little tool, I'm going to use the same formula that loads on default when opening the program, except, I'm going to change the power and make it 2 instead of 8. Now many of you may have already loaded this formula with this little change, since the original 2D Mandelbrot set uses the 2nd power. And many of you would have gone, "Hmm, but that looks nothing even near the amazing Mandelbrot set!" ... Well, if you slice that weird looking thing using the cutting tool, you'll see something more familiar ;)

Allow me to demonstrate. Here is the very strange looking 3D version of the Mandelbrot set:

3D Mandelbrot Set
Next, I simply clicked on the z-axis checkbox (See image above), left the value as 0.00, and clicked Calculate 3D ... :

3D Mandelbrot Set cut along z Axis at 0.00
:) ... Remember this? Isn't it beautiful? Now, the nice thing about this is that, you can zoom into those little nooks and crannies, some of which are not really reachable when you're trying to navigate the entire 3D fractal in it's full bulk. Here, let me show you...:

Zoom-in 01

Zoom-in 02

Zoom-in 03
Nice :) Now let me change the colouring a bit so we can better see what's going on in there:


Well, it's only a little better, but you get the idea :) ... From here you can choose a spot, zoom in, zoom back out again, choose a different spot and try again, etc... With different formulas even the most experienced 3D fractalnauts would be able to find new and interesting areas had they never used cutting before.

Ok, now I'll load the original Mandelbulb (power 8) to demonstrate further. Here she is, cut in exactly the same way as above:

Mandelbulb cut along Z-axis at 0.00

Now, what happens if we change the value "0.00" ? It gets cut through either higher or lower, depending on, of course, whether you put in a positive or negative value. Here is a series of screenshots to demonstrate:

Mandelbulb cut along Z-axis at -0.8

Mandelbulb cut along Z-axis at -0.4

Mandelbulb cut along Z-axis at -0.2

Mandelbulb cut along Z-axis at 0.3

Mandelbulb cut along Z-axis at 0.6
So it follows that the same thing can be done with the x and y axis. And you can turn any/all of them on at the same time. Here I cut the Mandelbulb along the z and y axi, both at 0.00 (with a bit of rotation for a better view):


And that concludes my 5th Tutorial page about the wonderful Mandelbulb 3D program. Thanks for watching! :)


If my tutorial is helping you, please consider supporting me over at my Patreon page.
I also have a deviantArt gallery.


Go to the next Tutorial page - Mandelbulb 3D Tutorial: Render Quality

Monday, June 27, 2011

Mandelbulb 3D Tutorial: Colour and Lighting cont.

Next, the Ambient tab:

I've played around with each little slide and button for half an hour and still, can't seem to come up with good explanations for all of them. I blame this on a lack of coffee. But I'll try my best and I'm sure through trying yourself, you'll get the general idea:

The "Amb" colours and slider affect the colour and intensity of the all other colours. They're like coloured lenses through which you're looking at your image, and the slide adjusts their brightness. Sliding all the way to the left essentially turns them off.

The Depth colours and slider affects the ambient background colours. The background gradients from your one chosen colour into the other.

Then you have the fog slide :) Adds spookiness to your image :) ... I remember using it in my very first 3D fractal art, back when I had no idea what I was doing. Simply adds luminescent fog of the colour of your choice around your fractal.

The fog offset decreases or increases general fogginess to the picture.
Far offset does a similar thing but starts from far back behind the fractal.

The Ambient Shadow bar is a strange one... From my observations using my forest image below, its was like I was turning a light deep within the fractal on and off, making the fractal glow or go completely dead. Again, I'm probably not quite understanding this properly yet and will add more info here once I've had more experience.

My apologies for such vague descriptions but I am truly a beginner myself. Just play around with them like I've been doing and you'll understand what they do intuitively. Here's my image after some tinkering. (Note that though I didn't (and still don't) really understand how most of the Ambient settings work, I still created this from a pre-conceived idea in my head. My forest, but foggy in the night time):

Mandelbulb Dark Forest

Mandelbulb 3D Tutorial: Lighting and Colouring

To continue...! Once again, let me state that I've only just started with Mandelbulb 3D and thus my knowledge is still in it's nascent stage. I'm doing this tutorial at this stage deliberately, so that all you guys who need it feel that I'm on more or less the same level as you: I know nothing to nearly nothing :P

Ok, on we go. To start, you need to open up your .m3i or .m3p that you saved last time (see previous tutorial page).
If opening an .m3p, remember to click on "Calculate 3D" to render your image once again.

If you remember, this is the image I am working with:


Now you need to go to the Lighting window, which should have opened up when you opened Mandelbulb 3D:


There it is. The first thing you should notice is those little Li 1, Li 2, Li 3, etc, tabs right at the top. Each one can be turned on or off with that little check-box just below "Li 1" ... Each Lighting tab can be either global or positional, and you can change the colour of the light with the little button just below the on/off check-box.

Sunday, June 26, 2011

Mandelbulb 3D Tutorial: The Basics

Alrighty! Finally decided to get down and start documenting all I've learnt so far about Mandelbulb 3D, a wonderful program for rendering 3D fractals.

Follow me on Tsu! Join up using this link: (It's invite-only, and you've just been invited =) ):
http://www.tsu.co/Mandelsage

First thing to say is, don't get intimidated by all the very technical math terms found when you open the program! You don't need to worry about most of it for now. (Though most of them, if you hover the mouse over them, will have a little description as to what they do in practical terms). Just follow my lead. So this is what the program looks like upon first opening it:


Also, two other windows open up with this one, called Formulas and Lighting, which I'll get to later.

The first thing I'm sure your eyes fixes upon is that big juicy looking button called "Calculate 3D" ... Go ahead and click on it ;D ... Here is what you should see after a quick rendering:

Friday, June 17, 2011

Fractal eXtreme: The NovaM Set

I cannot begin to tell you how awesome this fractal set is... "The possibilities are infinite", as they say on Fractal Forums, and in the case of NovaM, this is truly the case. As with all the other sets I've shown you since the original Mandelbrot, I won't go into the maths of this one because honestly, even though I am more than capable of understanding it all if I wanted to, I'm just too fascinated with the colourful results to care. From what I remember from reading about it though, I can tell you that it is based on the Newton Set formula, but it adds a constant (either a real or complex number) after each iteration. This constant is what Fractal eXtreme allows you to vary, through the Plug-in Setup option.

And not only does it have that variable constant, it also has a Julia form... Are you starting to imagine what possibilities we have here? Well I'm gonna show you. First, take a look at the fascinating creature that loads as the NovaM default:

NovaM x: 3

Isn't it gorgeous? As the caption states, if you go have a look at its Plug-in Setup, you'll find x is 3, and y, 0.

From here, you have a multitude of options. You could simply start zooming in. Or, using Plug-in Setup, you could start changing that x value. (Or the y value, or both!) Just with this feature alone you can yield thousands of amazing Fractals to explore, yet it's only the beginning... For every change you make to those x and y values, you are able to generate an array of Julias and of course you're able to zoom into those as well(!).

Do you see how I spent hours playing with this Set last night?

Wednesday, June 15, 2011

Fractal eXtreme: The Hidden Mandelbrot Set

Ok, so here's one you can spend hours on, despite its rough, untidy appearance upon first loading:


Firstly, it isn't called the "Hidden Mandelbrot" for nothing. If you start zooming into the more interesting (less noisy) areas, you'll find you'll discover a few familar shapes :) (And yes, some that are not so familiar)... Have a look:


Really nice, right? :) Now, while there is no Plug-in Setup option for the Hidden Mandelbrot, you can generate Julias with it. Here are some good examples, with x/y locations: