
Next, the Ambient tab:
I've played around with each little slide and button for half an hour and still, can't seem to come up with good explanations for all of them. I blame this on a lack of coffee. But I'll try my best and I'm sure through trying yourself, you'll get the general idea:
The "Amb" colours and slider affect the colour and intensity of the all other colours. They're like coloured lenses through which you're looking at your image, and the slide adjusts their brightness. Sliding all the way to the left essentially turns them off.
The Depth colours and slider affects the ambient background colours. The background gradients from your one chosen colour into the other.
Then you have the fog slide :) Adds spookiness to your image :) ... I remember using it in my very first 3D fractal art, back when I had no idea what I was doing. Simply adds luminescent fog of the colour of your choice around your fractal.
The fog offset decreases or increases general fogginess to the picture.
Far offset does a similar thing but starts from far back behind the fractal.
Far offset does a similar thing but starts from far back behind the fractal.
The Ambient Shadow bar is a strange one... From my observations using my forest image below, its was like I was turning a light deep within the fractal on and off, making the fractal glow or go completely dead. Again, I'm probably not quite understanding this properly yet and will add more info here once I've had more experience.
My apologies for such vague descriptions but I am truly a beginner myself. Just play around with them like I've been doing and you'll understand what they do intuitively. Here's my image after some tinkering. (Note that though I didn't (and still don't) really understand how most of the Ambient settings work, I still created this from a pre-conceived idea in my head. My forest, but foggy in the night time):
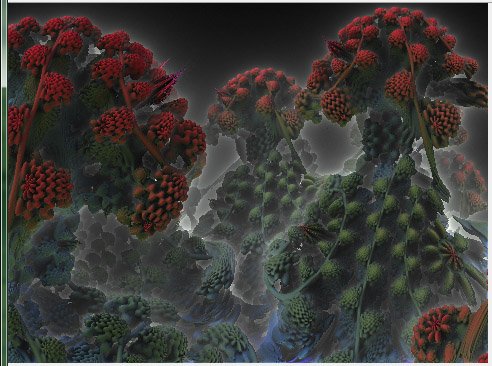 |
| Mandelbulb Dark Forest |

And now on to the Lights Tab:
As I said in the previous post, there are multiple Light tabs at the top. You can have up to 6 light sources. Let me note now that with the Dark Forest above, I used the first two light sources, both black, and both Global. You can adjust how the light falls on the fractal with the x- and y-angle sliding bars. Clicking "Lightangles relative to object" also changes things a bit but I'll have to experiment more to find out exactly how. I have left "HS", "Diffuse", "Vis." and "Spec" alone for now.

Then we have the Positional light Tab. First you need to check "On".
A light will pop up, nice and bright somewhere on the screen. Next thing to do is position it somewhere. You can start by clicking on the "mid" button and then clicking somewhere on the image. Then use the X-, Y- and Z-pos sliding tabs to position it more accurately. Increase and decrease the brightness of the light with the two arrows just below "Amount".
And of course, you can change its colour with the button just below the "On" checkbox.
That's it really. In this next image, I wanted it to look like there were three white lights within the "roots" of the trees, lighting them from below and within. So I turned Li3, Li4 and Li5 on, made them positional, moved them using the x,y, and zpos sliding bars, toned down the fog quite a lot, and also, I adjusted the x and y angle of the two global lights (Li1 and Li2) to get this image:
 |
| Mandelbulb Dark Forest, lit from below the trees |
And that, I do believe, concludes Colouring and Lighting :)
But for fun, let me try the following. In my head now, I have two scenarios: One is the forest at daybreak, in the morning, The other is it with the sun shining high in the sky at noon. I'm going to try different lightings and will post the results below.
 | |
| Mandelbulb Forest at Daybreak |

I did this by switching off the three positional lights (Li3, Li4 and Li5) and adjusting the "Amb" and "Depth" colours and sliding bar positions under the ambient tab (see image on the right).
 |
| Mandelbulb Forest at Midday with the sun up high :) |
Success, more or less :) ... I got lost in settings so can't remember exactly what I did. Definitely Amb and Depth changes again, and I added a 3rd Global light, quite a dark yellow. Oh! I didn't mention back in the beginning of the post: I made a plain black image (jpg) and set it as the background using the "Background pic" tab. I used it for all the forest images on this page except for the above one.
Thanks for listening folks.
Go to next tutorial page - Mandelbulb 3D Tutorial: Different 3D Fractal Formulas and Hybrids

If my tutorial is helping you, please consider supporting me over at my Patreon page.
I also have a deviantArt gallery.
I also have a deviantArt gallery.
Go to next tutorial page - Mandelbulb 3D Tutorial: Different 3D Fractal Formulas and Hybrids

Hey,
ReplyDeleteI wanted to thank you for this (and other) tutorials, you have really helped me, and I'm starting to get addicted to making these spacey pictures!
I love doing it, even though I'm only doing it for 3 days now.
I have already progressed a lot, thanks again!
Here is my first picture I created, by using and following your tutorial!
http://imageshack.us/f/62/mandelboob1.jpg/
Keep doing what you are doing, I love you blog!
Rinto
Hi there Rinto,
ReplyDeleteThanks very much for your comment. I have recently been so swamped with work that I've had no time for my dear fractal blog... But I really want to get back into it sometime soon. And it's comments like this that inspire me further to keep on doing what I love.
Thanks again, and please keep at it! Madelbulb is an extraordinary piece of software!
Cheers
Jody
Yes it would be nice to see some more tutorials on Mandelbulb 3D!
ReplyDelete